Flash Intex I-Buddy Tablet
Intex I-Buddy Flash File And Flasher
Intex I-Buddy Flash Tools Download

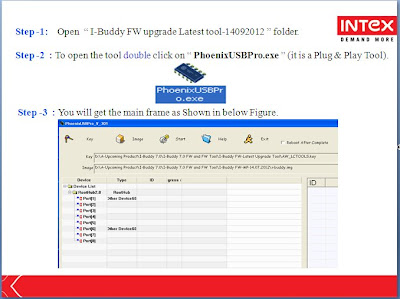
Step -2 : To open the tool double click on " PhoeftixUSBPro.exe "(it is a Plug & Play Tool).
PhoenixUSBPro.exe
Step -3 : You will get the main frame as Shown in below Figure.
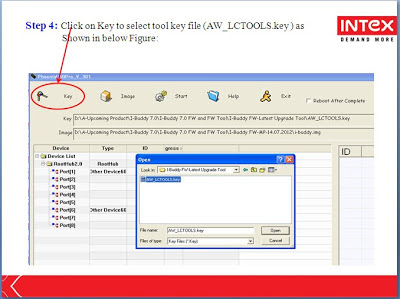
Step 4: Click on Key to select tool key file (AW_LCTOOLS.key ) as Shown in below Figure:
.jpg)
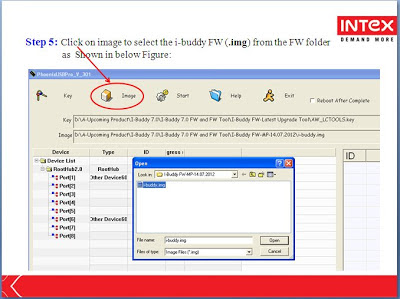
Step 5: Click on image to select the i-buddy FW (.img) from the FW folder as Shqwn in below Figure:
.jpg)
Step 6: Click on Start to upgrade the FW as shown in below Figure:
Step 7: Press and hold the Volume Plus (+) key connect the i-Buddy tablet with PC via USB data cable and keep pressing Power ON key(approx 5-10 times) till you will get the staPisas shown in below figure (After necessary driver update).Note: I-Buddy Tablet should be Power OFF.
.jpg)
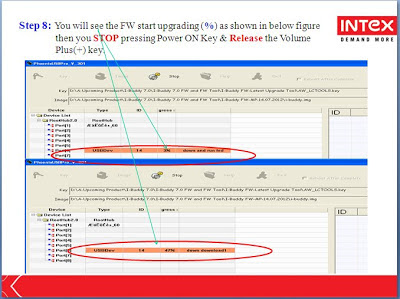
Step 8: You will see the FW start upgrading (%) as shown in below figure then you STOP pressing Power ON Key & Release the Volume Plus(+) key.
.jpg)
Step 9: Power on the device after FVV upgrade is finished successfully You will see the below figure.
.jpg)
Intex I-Buddy Flash File And Flasher
Intex I-Buddy Flash Tools Download
Step -1: Open I-Buddy FW upgrade Latest tool-14092012 " folder.
Step -2 : To open the tool double click on " PhoeftixUSBPro.exe "(it is a Plug & Play Tool).
PhoenixUSBPro.exe
Step -3 : You will get the main frame as Shown in below Figure.

Step 4: Click on Key to select tool key file (AW_LCTOOLS.key ) as Shown in below Figure:
.jpg)
Step 5: Click on image to select the i-buddy FW (.img) from the FW folder as Shqwn in below Figure:
.jpg)
Step 6: Click on Start to upgrade the FW as shown in below Figure:
Step 7: Press and hold the Volume Plus (+) key connect the i-Buddy tablet with PC via USB data cable and keep pressing Power ON key(approx 5-10 times) till you will get the staPisas shown in below figure (After necessary driver update).Note: I-Buddy Tablet should be Power OFF.
.jpg)
Step 8: You will see the FW start upgrading (%) as shown in below figure then you STOP pressing Power ON Key & Release the Volume Plus(+) key.
.jpg)
Step 9: Power on the device after FVV upgrade is finished successfully You will see the below figure.
.jpg)
Download FlashTools And File From Here
0 comments:
Post a Comment