Saturday, April 27, 2013

Nokia X1-01 Not Power On Dead Problem Solution

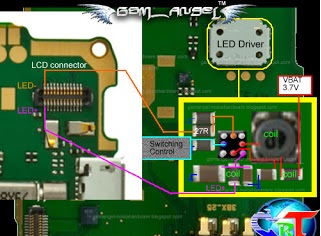
This article is for Nokia X1-01 No Power On Dead Problem Solution  If your phone’s is dead consult the diagram below. This solution works for all Nokia X1-01 RM-713 .

Please Note that we will edit these solutions or add new ones if found in this page at any time in the future. So feel free to come back any time on this page to stay up to date.


Try to Selftest mxkey Finding "LCD FAILED"

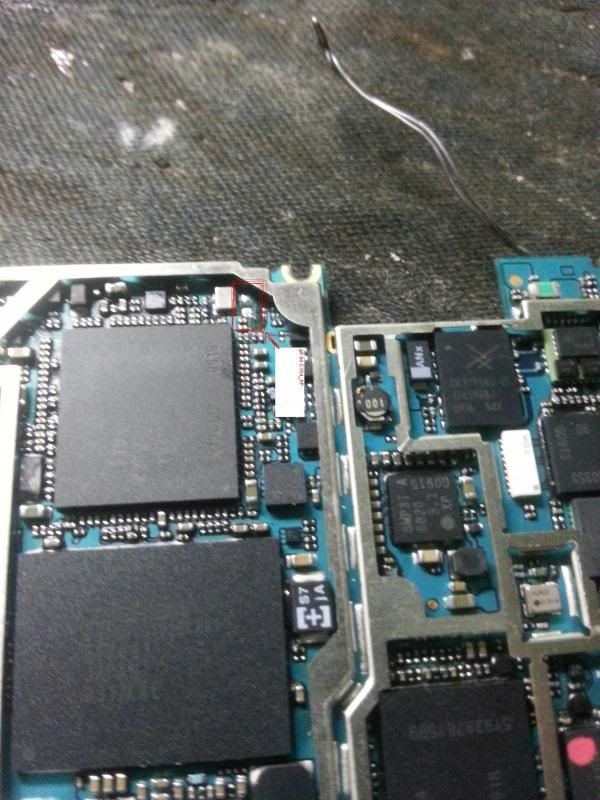
Replace New LCD No Luck,I Try To Trace Lcd Ways.

Here Are Nokia X1-01 Display LCD Connector Ways Jumpers. Please Observe Carefully.
Finish And Test :)

If you have further Questions please don’t hesitate to leave a comment.

Note: Every diagram we post on mobilerdx.com is tested by one or more members of our team. Still Use them at Your Own Risk we are not responsible if these solutions may cause any harm to your phone.

Nokia 113 Usb Cable Pinout Ways For All Box

This article is for Nokia 113 Usb Cable Pinout Problem solution. If your phone’s is having Pinout problem consult the diagram below. This solution work on all Nokia 113 RM-871.

I have marked all Nokia 113 Usb Cable Pinout Ways jumpers points in this diagram.

Please Note that we will edit these solutions or add new ones if found in this page at any time in the future. So feel free to come back any time on this page to stay up to date.


The main pinout is see picture below, see which wire connect to which point on set, just match color.do it & enjoy Nokia 113 USB flashing.

If you are new & want to flash this way then First cut any usb cable that you want to use for USB flashing.

Now follow the procedure.....(This procedure is for all)

1.Connect 
Black wire to black point on set that are marked
2.Connect
Green wire to Green point on set that are marked
3.Connect
Yellow wire to Yellow point on set that are marked
4.Connect
Red wire to Red point on set that are marked

Thats it.Follow Picture 1 to Picture 2

Use Any Box Like Hwk Box ,Mx-Box, Atf Box For Flash Ur Nokia 113 RM-871 Phone.

Nokia 113 Usb Cable Pinout Ways For All Box

Nokia 113 Usb Cable Pinout Ways For All Box

Note: Every diagram we post on mobilerdx.com is tested by one or more members of our team. Still Use them at Your Own Risk we are not responsible if these solutions may cause any harm to your phone.

Nokia x3-00 Mmc Memory Card Problem Jumper Solution

Nokia x3-00 Memory Card Mmc Not Detected Problem Repairing Solutions are available in the following article. Also you will find Nokia x3-00 Mmc Ways and Jumpers information in the diagrams further in this post.This solution works on all x3.

In Nokia x3-00 Memory Card Problem can occur because of the broken MMC Jacket. You can replace the MMC Jacket but if in any case the prints are broken you can Jumper the Memory Card Jacket to the points as shown in further diagram.

Please Note that we will edit these solutions or add new ones if found in this page at any time in the future. So feel free to come back any time on this page to stay up to date.


Here Are Solution Please Oveserve Carefully.
Nokia x3-00 Mmc Memory Card Problem Jumper Solution

If you have further Questions please don’t hesitate to leave a comment.
Note: Every diagram we post on mobilerdx.com is tested by one or more members of our team. Still Use them at Your Own Risk we are not responsible if these solutions may cause any harm to your phone.

Nokia 1616 light ways

Now I showing nokia 1616 lcd and keypad light ways.Some time may be light problem in your nokia 1616 phone.May be this problem for broken light ways.see the below picture and repair this proble.


How to do this : At first check light voltage on your phone.Then check red and yellow line ways if you see they are broken then make this jumper.


You may also like

Nokia C5-00 Vibrate Only Problem Repair Solution

Nokia C5-00 Vibrate Only Problem Repairing Solutions are available in the following article. Also you will find Nokia C5-00 Vibrate Only usefull information in the diagrams further in this post.

In Nokia C5-00 Vibrate Only Problem can occur because of the Cell Phone’s Motherboard. Bad connections can happen for many reasons like if it’s dropped or got wet, bad connection may also happen because of Carbon, Rust or even Dirt. So first of all you should clean Motherboard of the Mobile Phone.

You Can Use any cleaning liquid for this purpose like CTC or any other you prefer. If you are certain that the bad connection is not the reason for your Mobile Phone’s fault.

Please Note that we will edit these solutions or add new ones if found in this page at any time in the future. So feel free to come back any time on this page to stay up to date.


Nokia C5-00 Vibrate Only Problem Repair Solution

If you have further Questions please don’t hesitate to leave a comment.

Note: Every diagram we post on Mobilerdx.com is tested by one or more members of our team. Still Use them at Your Own Risk we are not responsible if these solutions may cause any harm to your phone.

Friday, April 26, 2013

Nokia Asha 203, 202 Test Mode Local Mode Problem Solution

Nokia Asha 203, 202 Local Mode Problem Repairing Solutions are available in the following article. Also you will find Nokia Asha 203, 202 Test Mode Solution and other repairing information in the diagrams further in this post.

In Nokia Asha 203, 202 Local Mode or Test Mode problems occur because of the Software Problems, in some cases it may be caused by hardware problems too. Whenever you get this problem First thing you should do is Flash your phone with same or Latest Firmware of the Cell Phone available at the time. Then write a good Permanent Memory(PM) file of your phone. Then Do a complete Unlock and check if the Problem is solved. Before Doing any hardware solution you should clean the Motherboard of the Mobile Phone.

Please Note that we will edit these solutions or add new ones if found in this page at any time in the future. So feel free to come back any time on this page to stay up to date.

Nokia Asha 203, 202 Test Mode Local Mode Problem Solution

If you have further Questions please don’t hesitate to leave a comment.

Note: Every diagram we post on Mobilerdx.com is tested by one or more members of our team. Still Use them at Your Own Risk we are not responsible if these solutions may cause any harm to your phone.

Thursday, April 25, 2013

Galaxy Core 2 SIM phong cách giống Galaxy S III


Samsung lại chuẩn bị cho ra mắt một smartphone Android tầm trung mới sở hữu lõi kép, hỗ trợ 2 SIM với ngoại hình mang nhiều nét giống Galaxy S III.
Galaxy Core có tên mã GT-I8262 và hình ảnh về sản phẩm này vừa được Hi-tech.mail tung lên mạng. Theo GSM Arena, model này dự kiến sẽ được phát hành ở Trung Quốc và Nga vào giữa tháng 5, mức giá tham khảo là 320 Euro, tương đương khoảng 8,6 triệu đồng.
Galaxy-Core-jpg-1366940468_500x0.jpg
Galaxy Core với ngoại hình tương tự như Galaxy S III. Ảnh: Hi-tech.mail.
Galaxy Core có thiết kế mang nhiều nét giống với Galaxy S III, từ mặt trước cho tới mặt lưng, cụm camera, đèn Flash cùng loa ngoài. Máy vẫn sử dụng kiểu dáng vỏ rời, làm từ nhưa, mặt lưng có hoa văn giống như trên chiếc S4 thế hệ mới.
Về cấu hình, smartphone mới lộ diện của Samsung được trang bị tính năng 2 SIM, có màn hình 4,3 inch với độ phân giải WVGA, dùng chip lõi kép tốc độ 1,2 GHz, RAM 768 MB. Bộ nhớ trong 8 GB, hỗ trợ khe cắm thẻ nhớ mở rộng, Wi-Fi, Bluetooth 4.0 và GPS.
Tuy nhiên, Galaxy Core chỉ có camera 5 megapixel. Máy nặng 140 gram, mỏng 8,95 mm và sẽ chạy Android 4.1 Jelly Bean khi bán ra thị trường, thay vì 4.2 như Galaxy S4.
Mỹ Anh

Tấn công mạng ở Hà Lan, 10 triệu người bị ảnh hưởng


Một chuyên gia an ninh mạng Hà Lan - Ảnh: AFP

(TNO) Trên 10 triệu người dân Hà Lan đã không thể dùng chữ ký online (chữ ký điện tử trực tuyến) để thanh toán hóa đơn hoặc đóng thuế trên mạng sau một vụ tấn công mạng.

Hệ thống chữ ký online quốc gia DigiD của Hà Lan không thể truy cập được kể từ ngày 23.4 do một cuộc tấn công mạng kiểu từ chối dịch vụ (DDoS), AFP dẫn thông cáo của Bộ Nội vụ Hà Lan ngày 24.4.
Người phát ngôn Frank Wassenaar của Bộ Nội vụ Hà Lan cho AFP biết có đến hơn 10 triệu trong số 17 triệu dân số Hà Lan dựa vào DigiD để thực hiện các thanh toán trên mạng.
Tuy nhiên, Bộ Nội vụ Hà Lan khẳng định tin tặc đã không đánh cắp thông tin cá nhân của người dùng DigiD.
Theo AFP, DigiD là một hệ thống an toàn dành cho người dân Hà Lan thực hiện các giao dịch trên mạng mà không cần phải đến tận nơi để ký tên.
Người dân Hàn Lan dùng DigiD để đóng thuế, thanh toán hóa đơn...
Đơn vị an ninh mạng thuộc lực lượng cảnh sát Hà Lan đang tiến hành điều tra vụ tấn công mạng này, theo Bộ Nội vụ Hà Lan.
Một số ngân hàng và hãng hàng không KLM của Hà Lan cũng bị tấn công mạng kiểu DDoS trong những tuần gần đây, khiến các website và dịch vụ ngân hàng online bị tắt nghẽn trong nhiều ngày liền.
Phúc Du

Ultrabook màn hình Full HD, bàn phím tháo rời của Toshiba


Nokia 2710 Mic Problem Jumper Solution


This article covers Nokia 2710 Mic Problem Solution. If your phone’s microphone is not working consult the diagram below. This solution works on all Nokia Nokia 2710.

I have marked Nokia 2710 Ways and Jumper points in this diagram but before you make these jumpers make sure that a faulty microphone is not causing this problem. Test it with an electronics meter or simply replace it with a new one.

Please Note that we will edit these solutions or add new ones if found in this page at any time in the future. So feel free to come back any time on this page to stay up to date.
Nokia 2710 Mic Problem Jumper Solution
If you have further Questions please don’t hesitate to leave a comment.

Note: Every diagram we post on mobilerdx.com is tested by one or more members of our team. Still Use them at Your Own Risk we are not responsible if these solutions may cause any harm to your phone.

Nokia 2710 Mmc Memory Card Problem Solution

When the MicroSD card inserted on the device and nothing happens but it displays "memorycard not inserted" something like that, this solution may help fix and repair the problem if the Nokia 2710 navigation edition has been damaged by any means like wet damaged or accidentally dropped.

The solution below shows the particular SMD components that needs to check, trace and replace to possibly fix the problem.


Nokia 2710 mmc memory card problem solution
Nokia 2710 Mmc Memory Card Problem Solution

 tips:
1. Check the MMC card detection switch first, you can read a voltage on that area about 1.8 volts if unpressed and 0 volts if pressed.
2. Check and trace the MMC supply voltage it is marked with VSIOD and connected to MMC socket pin #4 then the pin #6 for groundings.
3. If both MMC power supply voltage and MMC detection switch is okay, the problem may lies on the ESD-EMI filter chip. Replace the ESD filter if necessarily.

Nokia 2710 Full Keypad Ways Solution

Nokia 2710  Keypad Problem Repairing Solutions are available in the following article. Also you will find Nokia 2710 Keypad Ways and Jumpers information in the diagrams further in this post.

In Nokia 2710 Keypad problem can occur because of the faulty Keypad IC bad connection to the Cell Phone’s Motherboard. So first of all you should clean Nokia 2710 Keypad Ways and Motherboard of the Mobile Phone. If cleaning does not work then you can replace the Keypad IC.

Please Note that we will edit these solutions or add new ones if found in this page at any time in the future. So feel free to come back any time on this page to stay up to date.

Nokia 2710 Full Keypad Ways Jumpering

If you have further Questions please don’t hesitate to leave a comment.

Note: Every diagram we post on mobilerdx.com is tested by one or more members of our team. Still Use them at Your Own Risk we are not responsible if these solutions may cause any harm to your phone.

Nokia 2710 Display Lcd Light Probelm Solution Jumper


If ever encountered a black or dark LCD screen display on nokia 2710, this problem is cause by the LED backlight failure or it doesn't light up.
This solution may help fix and repair Nokia 2710 No LCD Screen Display Backlight LED problem that result to a dark screen display on the LCD.

If this problem happens you may then first try to install a new replacement LCD screen to ensure that the LCD LED's caused the problem or not. if the Back light LED's still does not work, you may then proceed to hardware troubleshooting and used this solution below.


Solution for Nokia 2710 LCD screen display
backlight LED not working

Nokia 2710 Display Lcd Light Probelm Solution Jumper

The solution above showed the LCD and keypad backlight LED driver circuit. this circuit holds and drive the LED's to light up or works.
You may start to trace the LED's positive ansd negative line paths from the LCD pin connector down to the components where it is being connected.
Check the LED driver IC supply voltage, this voltage has a rating value of 3.7 volts which feeds from the phones battery.
If all of the line paths and supply voltages were both fine, you may then proceed to replace the LED driver IC.

Note: a damaged LED driver IC on nokia 2710 will also result to keypad backlight failure. Therefore if the keypad backlight is working and only the LCD display backlight does not work, this doesn't mean that the LED driver chip is faulty or damaged. This indicates the LED driver IC is still working and fine.

Nokia 2710 Battery Connecter Ways Jumper

This post is for Nokia 2710 Battery Connector Ways Jumper points. If your phone’s battery terminal points are broken use the diagram below to solve this problem.

I have marked all three battery terminal connector ways with different colors to make things more clear. The first leg is Positive the second leg is Negative and finally the third leg is BSI. Just make the jumpers to their first contact points, rest of the ways are just in case that your first points are also broken.

Please Note that we will edit these solutions or add new ones if found in this page at any time in the future. So feel free to come back any time on this page to stay up to date.

Nokia 2710 Battery Connecter Ways Jumper'
Nokia 2710 Battery Connecter Ways Jumper
If you have further Questions please don’t hesitate to leave a comment.

Note: Every diagram we post on mobilerdx.com is tested by one or more members of our team. Still Use them at Your Own Risk we are not responsible if these solutions may cause any harm to your phone.

Câu áp 2.8V cho camera trước IP4

Tuần này mình nhận được mấy con IP4 vào camera trước treo không bung hình ra.mà sao máy hàn quốc không có con FL21 hay Seri 5K lổi phần đó không biết..Theo hình ảnh của sờ lu sờn thấy nó chỉ mượn áp 2.8V ngay con tụ gần sotket camera trước.Câu thì ok nhưng mất thẩm mỉ dây đồng dài khó dấu dưới main.

Thay vì câu theo hình này


http://img.photobucket.com/albums/v190/tamansu/Graphic3_zps8b489c39.jpg

Anh em câu theo hình này tốn ít dây đồng mà đẹp cái main nữa.Câu từ C485 qua FL6..Khởi động máy lại có lúa..


http://img.photobucket.com/albums/v190/tamansu/Graphic3_zps66dbb039.jpg

Chia sẽ nhỏ cho anh em vào nghề mới làm IP..anh em biết rồi đừng chê cười tại em làm được ban nào chia sẻ ban đó thôi ạ.

Fix Lỗi iTunes Không Kết Nối Được Với iTune Store

Fix Lỗi iTunes Không Kết Nối Được Với iTune Store

 
Khi iTunes ko kết nối được với iTunes Store tức là đã đăng nhập ID và pass rồi nhưng vẫn ko vào được iTunes Store.
Mình chia sẽ cách fix lỗi này như sau:


Tạm thời tắt iTunes đi
Cách fix:
- Trên PC ta vào Star -> Run , gõ lệnh cmd [enter]
- Trong khung DOS ta tiếp tục gõ các lệnh sau :

netsh <enter>
winsock <enter>
reset <enter>


Mở iTunes lên và ta xem kết quả nhé
Sau khi đã fix

Thank thinh_ip

chia sẻ 1 pan 3gs rớt nước mất nguồn

chia sẻ 1 pan 3gs rớt nước mất nguồn


[Chia sẽ] 6.1.2 hạ xuống 5.1.1 không shsh ( Dành Cho Máy Thay Cặp 01.59.00)

Xin chào tất cã các bạn !

Hiện nay theo mình thấy thì có rất nhiều anh em đang gặp khó khăn về vấn đề này. hôm nay mình sẽ làm 1 topic hướng dẫn anh em hạ ver iphone4 từ IOS 6 xuống fw 5.1.1 .(trường hợp dành cho những máy lock làm phần mềm giá quá đắt đõ, muốn hạ về version thấp đễ thay cặp 1.59 hiện 4.12 mà ko có shsh )

cách thực hiện bao gồm các bước như sau :

đầu tiên ta cần chuẫn bị các món đồ chơi như

- Sn0wbreeze ver mới nhất ( dowload tại http://ih8sn0w.)
- 1 FW 5.1.1 cũa Iphone 4
- 1 shsh 5.1.1 cũa iphone 4 bất kỳ
- redn0w ver mới nhất
done!

Bước 1 :

mỡ sn0wbreeze lên nó sẽ hiện là 1 cái bảng ta chon " OK " . tiếp tục ta chon Browse for an IPSW và chon FW 5.1.1 , sau đó ta chọn " Click the arow to continue . ta chọn "Ifaith mode" . Click ok và chọn dến shsh 5.1.1 bất kì cũa iphone4 . chọn "Genarel" và tiếp tục chon "activate the iphone " cuối cùng là chon " build Ipsw " . ( vậy là xong phần tạo F2w )

sau đó trong lúc chờ build fw thì ta nhấp nháp ly cafe hoặc làm cái bánh ngọt ......

Bước 2 :

Sau khi Đưa iphone cũnha bạn về DFU bang " Ired " . bạn mỡ Itune lên nhấn Shift + restore ( restore Fw mới vừa Tạo lúc nãy ) . và tiếp tục chờ...

chờ....

.............chờ.....

.....chờ..................đến 98% thì rút cáp ra.( itune sẽ báo lỗi nhưng đừng lo gì nhé )

Bước 3 :

lúc này máy bạn đang bị dính DFU có đúng không nào , rất đơn giãn nhé . Bạn chĩ cần lấy RedSn0w Chọn Extra -> Select ipsw (5.1.1)-> recovery Fix sau đó đưa về DFU và chờ máy
chạy . sau khi chạy xong máy vẫn bị dính DFU nhưng cứ bình tĩnh , không sao cã lúc đó bạn chĩ việc dùng Redsn0w just boot là oke ngay..haha.!

Lúc này thì bạn biết điều gì rồi chứ .. trên tay iphne4 5.1.1 No SHSH nóng hỗi .! và chĩ việc đóng cặp 1.59 nữa là All Done nhé .

p/s : bài viết mang tình chất chia sẽ , ae nào biết rồi pro quá thì đừng chém em.

thanks các bạn đã quan tâm, có gì hỗng biết cứ liên hệ mình, mình không ngại giúp đỡ . chúc các bạn thành công


Thank TTmobile1990

Iphone 4 chạm đèn flash

Iphone 4 chạm đèn flash thay thế hoặc remove
Thank anh_gsm


link khác
http://img.photobucket.com/albums/v190/tamansu/iphone-4-cham-den-flash_zps884f8497.jpg

Tuesday, April 23, 2013

Nokia 1616 lcd light jumper

Nokia 1616 very popular hand set.It may be many kinds of hardware problem but lcd light problem is One of the common problem.This phone's lcd and keypad light part has make using a transistor and a diode.Maximum time damage transistor for this problem but transistor is not available.So this problem repair  is hard.But I make a solution of this problem without transistor.Now I showing how to repair this problem without transistor,using only jumper.


Hoe to do this work: First Check vcc voltage of light coil then check lcd light.If you see coil voltage ok but lcd light not found then check transistor and diod if tey are damage then make red and yellow mark jumper.After that cut red mark print near by keypad led light. Make same jumper of this photos very carefully .


You can also visit 

Nokia 1661 light jumper
Nokia 1661 lcd light ways
Nokia 1202 light solution
Nokia 1800 light solution
Nokia 1800 light jumper
Nokia 1200 light jumper

Asha 200, 201 Test Mode Locl Mode Problem Solution

Nokia Asha 200, 201 Local Mode Problem Repairing Solutions are available in the following article. Also you will find Asha 200, 201 Test Mode Solution and other repairing information in the diagrams further in this post.

In Nokia Asha 200, 201 Local Mode or Test Mode problems occur because of the Software Problems, in some cases it may be caused by hardware problems too. Whenever you get this problem First thing you should do is Flash your phone with same or Latest Firmware of the Cell Phone available at the time. Then write a good Permanent Memory(PM) file of your phone. Then Do a complete Unlock and check if the Problem is solved. Before Doing any hardware solution you should clean the Motherboard of the Mobile Phone.

Please Note that we will edit these solutions or add new ones if found in this page at any time in the future. So feel free to come back any time on this page to stay up to date.


Asha 200, 201 Test Mode Locl Mode Problem Solution

If you have further Questions please don’t hesitate to leave a comment.

Note: Every diagram we post on Mobilerdx.com is tested by one or more members of our team. Still Use them at Your Own Risk we are not responsible if these solutions may cause any harm to your phone.

Monday, April 22, 2013

Asha 305, 308 Insert Sim Problem Solution Ways Jumper

Nokia Asha 305, 308 Insert Sim Card Problem Repairing Solutions are available in the following article. Also you will find Nokia Asha305, 308 Insert Sim Ways and Jumpers information in the diagrams further in this post.

In Nokia Asha 305, 308 Insert Sim Card Problem can occur because of the faulty Sim Card Connector, You can always replace Nokia Asha 305, 308 Sim card jacket with a new one but if you Sim card jacket’s prints are broken diagrams further in this post can help you. Just follow the diagram and make the necessary jumpers.

Please Note that we will edit these solutions or add new ones if found in this page at any time in the future. So feel free to come back any time on this page to stay up to date.

Asha 305, 308 Insert Sim Problem Solution Ways Jumper
If you have further Questions please don’t hesitate to leave a comment.

Note: Every diagram we post on mobilerdx.com is tested by one or more members of our team. Still Use them at Your Own Risk we are not responsible if these solutions may cause any harm to your phone.

Sunday, April 21, 2013

Nokia 3110 Light Problem Ways Jumper Solution

Nokia 3110 Solution Ways and Jumper points are in this article. If your phone’s Lcd Display lights and keypad lights are not working make the jumper as shown in the diagram below. This solution works on all Nokia 3110 Rm-237.

First of all before making any hardware solutions clean the area behind LCD connector and the whole motherboard to make sure that rust or carbon is not causing this problem. I have marked Nokia 3110 light and keypad ways jumper points in the following diagram. If jumper does not work replace the marked component. Also try replacing the LCD itself because sometime damaged LCD can cause this problem.

Please Note that we will edit these solutions or add new ones if found in this page at any time in the future. So feel free to come back any time on this page to stay up to date.

Here Are Solution Please Ovserve Carefully

Nokia 3110 Light Solution Ways Jumper 2013
2nd Solution
nokia 3110c full light ways and solution jumper
If you have further Questions please don’t hesitate to leave a comment.

Note: Every diagram we post on mobilerdx.com is tested by one or more members of our team. Still Use them at Your Own Risk we are not responsible if these solutions may cause any harm to your phone.

Android Booster giúp tăng thời lượng pin điện thoại


Chặn ứng dụng chạy ngầm sẽ giúp smartphone tiết kiệm bộ nhớ RAM đồng thời cải thiện thời lượng pin sử dụng cho thiết bị. Android Booster là phầm mềm được đánh giá khá cao trong việc đảm nhận nhiệm vụ quản lý này.
Giao diện chính của Android Booster khá đơn giản, bao gồm 3 phần chính Battery Manager (quản lý pin), Optimize (tối ưu) và More Tools (các công cụ khác). Không thể tắt các ứng dụng chạy nền một cách triệt để là một trong những nguyên nhân khiến các smartphone bị tuột pin nhanh chóng. Với Optimize, người dùng có thể nhanh chóng đóng các ứng dụng đang chạy ngầm bằng một nút nhấn, Android Booster sẽ tự động xử lý tất cả.
1.jpg
Hoặc người dùng có thể tự mình chọn ra các ứng dụng cần đóng bằng cách nhấp vào biểu tượng Running Apps nhằm liệt kê danh sách những ứng dụng đang chạy để người sử dụng lựa chọn vô hiệu hoá. Tiếp đó đánh dấu chọn trước các ứng dụng đang chạy muốn tắt và nhấn Close.
Còn tính năng Battery Manager thể hiện tình trạng pin hiện tại và tùy chọn các chế độ sử dụng pin đã được thiết lập trước. Hoặc người dùng cũng có thể thêm và tự thiết lập các chế độ dùng pin theo ý muốn của mình với phần Add mode. Nếu chế độ hiển thị (Display) chiếm 45% năng lượng pin hao hụt và Wi-Fi chiếm 12% thì rất có thể màn hình thiết bị đang ở chế độ sáng khá cao và đang bật Wi-Fi. Lúc này, cách giải quyết tốt nhất nên chỉnh lại độ sáng màn hình phù hợp và tắt Wi-Fi nếu không dùng. Có thể xem các ứng dụng đang sử dụng pin và mức độ sử dụng của các ứng dụng đó bằng cách nhấp vào biểu tượng biểu đồ ở góc phải của màn hình.
2.jpg
Thông qua tính năng Network Manager, người dùng quản lý các ứng dụng đang kết nối mạng cùng với một thanh thể hiện lưu lượng cước Internet đã sử dụng. Có thể cài đặt định mức sử dụng để không phải lo lắng dùng mạng vượt quá định mức trong phần Setting/Monthly data limit. Có cả công cụ quản lý tập tin và quản lý các ứng dụng có trên máy.
Nếu pin trở nên nhanh hết đột ngột hoặc máy có triệu chứng chậm hẳn, nên vào Menu/Settings/Auto Optimization và chọn. Khi đó ứng dụng sẽ tự động đóng các ứng dụng đang chạy nền và tối ưu máy khi màn hình tắt. Có thể lựa chọn không tắt các ứng dụng nhất định trong phần Ignored App.
Tải về phần mềm miễn phí tại đây hoặc tìm tại Android Market với từ khóa Android Booster.
Minh Trí

Asus ra máy tính bảng 7 inch giá 150 USD


Model Memo Pad ME172V từng xuất hiện trong các tin đồn trước đây theo dự kiến sẽ bán tại Mỹ vào tháng 4 năm nay.
memo-jpg-1358134257_500x0.jpg
ME17V dùng chip 1 GHz, RAM 1 GB và GPU Mali-400. Ảnh: Engadget.
Memo Pad ME172V chạy trên hệ điều hành Android 4.1 Jelly Bean với màn hình IPS 7 inch độ phân giải 1.024 x 600 pixel có góc nhìn lên tới 140 độ. Sản phẩm được trang bị RAM 1 GB, bộ xử lý VIA VM8950 tốc độ 1 GHz với chip đồ hoạ Mali-400. Các khách hàng có thể lựa chọn dung lượng bộ nhớ trong của máy là 8 GB hoặc 16 GB. Model này có hỗ trợ khe cắm thẻ nhớ microSD.
Máy tính bảng mới của Asus sở hữu camera trước có độ phân giải 1 megapixel và khẩu độ f/2.0 có khả năng quay được video 720p với tốc độ 30 khung hình/giây. ME172V hỗ trợ Wi-Fi 802,11 b/g/n, microUSB, giắc cắm tai nghe và pin chạy được 7 tiếng. Cân nặng của Asus ME172V là 367,4 gram.
Thanh Tùng

Tablet giá rẻ Asus MemoPad Smart 10 sớm có Android 4.2


Máy tính bảng giá hơn 200 USD của Asus nâng cấp lên Android phiên bản mới nhất sớm hơn so với nhiều thiết bị cao cấp khác.
Asus MemoPad Smart 10.
Phiên bản phần mềm mới V10.6.1.15 hôm nay đã mang hệ điều hành Android 4.2.1 lên máy tính bảng Memo Pad Smart 10 đúng như lộ trình của Asus công bố trước đó. Phần tải về qua giao thức OTA có dung lượng khoảng 500 MB. 
Sau khi cập nhật, MemoPad Smart 10 sẽ có đầy đủ các tính năng mới của Android 4.2 mà tiêu biểu là việc sử dụng được nhiều tài khoản cùng lúc. Tiện ích này tương tự như máy tính Windows, sản phẩm có thể sử dụng nhiều tài khoản và lưu trữ dữ liệu người dùng khác nhau. Ngoài ra, phiên bản mới cũng có tốc độ hoạt động ổn định hơn và vài thay đổi nhỏ khác. 
MemoPad 10 được trang bị màn hình độ phân giải 1.280 x 800 pixel, RAM 1 GB, camera 5 megapixel và bộ nhớ trong 16 GB có thể mở rộng bằng thẻ nhớ microSD. Ngoài ra, model này còn được đồn là sở hữu webcam 1,2 "chấm" và chạy hệ điều hành Android 4.1 Jelly Bean.
Giá bán sản phẩm này là khoảng 240 USD tương đương khoảng 5 triệu đồng. 
Hoài Anh

Saturday, April 20, 2013

Nokia 110 Local Mode Test Mode Problem Repair Solution

Nokia 110 Test Mode Local Mode Problem Solution can be found in this diagram simply remove these two resistance bake of the battery terminal and if there is any rust and set is water damage clean the whole set with electronics cleaner and leave it to dry for a few mints.

In Nokia 110 Local Mode or Nokia 110 Test Mode problems occur because of the Software Problems, in some cases it may be caused by hardware problems too. Whenever you get this problem First thing you should do is Flash your phone with same or Latest Firmware of the Cell Phone available at the time. Then write a good Permanent Memory(PM) file of your phone. Then Do a complete Unlock and check if the Problem is solved. Before Doing any hardware solution you should clean the Motherboard of the Mobile Phone.

Please Note that we will edit these solutions or add new ones if found in this page at any time in the future. So feel free to come back any time on this page to stay up to date.

Here Are Mode Problem Test Mode Solution. Please Observe Carefully.
Nokia 110 Local Mode Test Mode Problem Repair Solution

If you have further Questions please don’t hesitate to leave a comment.

Note: Every diagram we post on Mobilerdx.com is tested by one or more members of our team. Still Use them at Your Own Risk we are not responsible if these solutions may cause any harm to your phone.

Nokia 1800,1616,1280 Test Mode Local Mode Problem Solution

Nokia 1800,1616,1280 Local Mode Problem Repairing Solutions are available in the following article. Also you will find Nokia 1800,1616,1280 Test Mode Solution and other repairing information in the diagrams further in this post.

In Nokia 1800,1616,1280 Local Mode or Nokia 1800,1616,1280 Test Mode problems occur because of the Software Problems, in some cases it may be caused by hardware problems too. Whenever you get this problem First thing you should do is Flash your phone with same or Latest Firmware of the Cell Phone available at the time. Then write a good Permanent Memory(PM) file of your phone. Then Do a complete Unlock and check if the Problem is solved. Before Doing any hardware solution you should clean the Motherboard of the Mobile Phone.

Please Note that we will edit these solutions or add new ones if found in this page at any time in the future. So feel free to come back any time on this page to stay up to date.
Nokia 1800,1616,1280 Test Mode Local Mode Problem Solution
If you have further Questions please don’t hesitate to leave a comment.

Note: Every diagram we post on Mobilerdx.com is tested by one or more members of our team. Still Use them at Your Own Risk we are not responsible if these solutions may cause any harm to your phone.

Friday, April 19, 2013

Nokia X1, X1-01 Handsfree Ways Jumper Solution

Nokia X1, X1-01 Handsfree Activated No Sound On Headphone Problem Repairing Solutions are available in the following article. Also you will find Nokia X1, X1-01Headset Solution and Jumpers information in the diagrams further in this article. If your cell phone is having one of these faults check these diagrams out and do the solutions step by step.

In Nokia X1, X1-0 Handsfree Problem can occur because of the faulty Handsfree Connector or bad it’s connection to the Cell Phone’s PCBA Motherboard. Bad connections can happen for many reasons like if it’s dropped or got wet, bad connection may also happen because of Carbon, Rust or even Dirt. So first of all you should clean Nokia X1, X1-01 Handsfree Connector Ways and PCBA Motherboard of the Mobile Phone.


You Can Use any cleaning liquid for this purpose like CTC or any other you prefer. If you are certain that the bad connection is not the reason for your Mobile Phone’s fault, then you can replace the Handsfree Connector with a new one.

If the problem still remains then you should continue with the following repairing solutions.

Here is a list of all the solutions for the mentioned problems or faults available at the moment. Please Note that we will edit these solutions or add new ones if found in this page at any time in the future. So feel free to come back any time on this page to stay up to date.
Nokia X1, X1-01 Handsfree Activated
Nokia X1, X1-01 Handsfree Ways Jumper
Nokia X1, X1-01 Headphone Solution
Nokia X1, X1-01 No Sound On Handsfree

Here Are The Repairing Solutions. Please Observe Carefully.
Nokia X1, X1-01 Handsfree Ways Jumper Solution

If you have further Questions please don’t hesitate to leave a comment.

Note: Every diagram we post on mobilerdx.com is tested by one or more members of our team. Still Use them at Your Own Risk we are not responsible if these solutions may cause any harm to your phone.

Thursday, April 18, 2013

Samsung C3303K Champ Display Light Problem Solution

Samsung C3303K Champ Display Lcd Light Problem Repairing Solutions are available in the following article.

In Samsung C3303K Champ LCD Led Lights Problem can occur because of the faulty Lights IC or it’s bad connection to the Cell Phone’s Motherboard. Before doing any hardware solution you should clean Samsung C3303K Champ  Display Led Light Ways Lights IC and Motherboard of the Mobile Phone. If cleaning does not work then you can replace the Lights IC.


Please Note that we will edit these solutions or add new ones if found in this page at any time in the future. So feel free to come back any time on this page to stay up to date.

Here Are Samsung C3303K Champ Problem Solution. Please Observe Carefully.
Samsung C3303K Champ Display Light Problem Solution
If you have further Questions please don’t hesitate to leave a comment.


Note: Every diagram we post on mobilerdx.com is tested by one or more members of our team. Still Use them at Your Own Risk we are not responsible if these solutions may cause any harm to your phone.

KERNEL *Matr1x* v3.0 | JB - 4.2/4.2.1 Nexus 4

KERNEL *Matr1x* v3.0 | JB - 4.2/4.2.1 *** KHUYÊN DÙNG ***


Tính năng:

- Tương thích các loại Rom JB 4.2 và 4.2.1. Có phiên bản cho rom của Google và bản cho Rom AOSP.

- Based on Linux kernel version 3.4.0

- GPU OC to 450 Mhz

- ARM CPU Topology (by Vincent Guittot)

- UV by 100mV for all frequencies and cores

- Various performance tweaks


Đánh giá cá nhân ZZ: 

- Cập nhật bản 3.0: tăng hiệu năng, cho phép UV bằng System Tuner

- Không thay đổi quá nhiều về hiệu năng nhưng cũng không làm giảm hiệu năng của N4 chút nào

- Thời lượng pin cải tiến đáng kể. 

- Máy chạy mát hơn và bạn thật sự sẽ không gặp phải hiện tượng liên quan.


DownloadỞ ĐÂY


Cách flash:

- Đưa file kernel vào thư mục gốc của bộ nhớ trong
- Reboot máy vào chế độ Recovery
- Flash bằng mục Install zip from sd card


Setting UV có Ở ĐÂY


franco.Kernel - r15

Tính năng: tác giả ko đưa ra nhiều thông tin. Chỉ có thông tin đáng chú ý: tương thích AOSP/AOKP.


Download:

Flash qua recovery

http://minooch.com/franciscofranco/Nexus4/zips

Flash qua bootloader/fastboot

http://minooch.com/franciscofranco/Nexus4/

Hướng dẫn thay đổi recovery Lenovo


Có 1 cách cài reovery khác(Yêu cầu máy đã root)Cài đặt chương trình Mobileuncle Toot trên CH Play vào máy hoặc tải Mobileuncle Tools_20121113v2.7.4.apk
Bản custum recovery.img down về,chép lên thẻ nhớ(kg bỏ trong thư mục nào hết)
Mở mobileuncle tool lên,chọn dòng chữ Recovery Undate,chọn bản recovery trên thẻ SD,chọn OK,chương trình hỏi có boot vào recovery thì chọn hủy,thực hiện thao tác trên 1 lần nữa cho chắc bởi có máy làm 1 lần boot vào recovery bị lỗi

[IMG][IMG][IMG][IMG][IMG]
[IMG]
Chọn dòng Into Recovery Mode
Khi vào recovery,nên backup lại 1 bản rom stock đã root đang sử dụng vào thẻ